Something about Jeffery

My photo
Always looking for unique and new stuff. Keen on learning n practising. Easily to get into my own world n submerge in it. You will find me if u look into ur heart!!

Sunday, November 20, 2011

White Chocolate and Raspberry Tartlet

Have been hearing a lot of people saying white chocolate and raspberry should get married, they are such a perfect match in dessert. I always want to make a dessert by using both of the ingredient. This tartlet is quite different with normal tart as the shell is harder, due to the gingernut biscuit. U can use any hard biscuit or shortcrust pastry as the tart shell. I like the gingery flavour from the biscuit, it actually balance up the sweetness from the white chocolate. Okie, let share the recipe now:


White chocolate and raspberry tartlet
Ingredient:


  • 1 packet of Arnott Gingernut biscuit

White chocolate ganache:
200g white chocolate button
100ml thickening cream
15g shortening


Raspberry jam
80ml (1/3 cup) water
4 tbsp caster sugar
150g frozen raspberry
3 tsp cornflour + 2 tsp cold water

Method:


  1. Preheat oven to 180oC. Place biscuit on a baking tray and bake for 5-8 minutes until the biscuit is soft. Using a saucer or small curved plate to shape the soften biscuit into small bowl shape. Set aside and cool.

For white chocolate ganache:


  1. Bring a pot of water to boil and turn down heat to simmer. Put the white chocolate and shortening in a bowl and sit on the simmering water for 1-2 minutes (make sure the bottom of the bowl doesn’t touch the water)

  2. Remove the bowl from the heat and stir the mixture until a smooth paste (if the white chocolate is unable to melt completely, put the bowl back onto the simmering water for another minute)

  3. After the white chocolate and shortening have melted, stir in cream and leave at room temperature for 10 minutes then refrigerate for 20 minutes

For raspberry jam:


  1. Bring the 80ml of water to boil. Stir in sugar until dissolve then add in raspberry and leave to boil for 5 minutes

  2. Sieve the raspberry liquid to remove the seed

  3. Bring the raspberry juice back into boil for another 5 minutes until slightly thicken

  4. Mix the corn flour and cold water to form a smooth paste. Slowly add the paste into the raspberry juice while stirring the juice. Bring back the jam to boil then off the heat and rest to cool.

To assembly:


  1. Fill the biscuit base with 1 ½ tablespoon of the white chocolate ganache then top with 1 teaspoon of raspberry jam

  2. Using a wooden skewer to swirl the raspberry to create the decorative pattern

  3. Refrigerate for at least 2 hour until the ganache is set well. Best serve after refrigerate overnight

Hope you will like it. FYI, I have started sellling this in Adelaide. If you or your friends are in Adelaide and would like to try, please welcome to contact me. See ya soon


Next time, i may share some Xmas recipe !!!

Monday, September 19, 2011

Almond and Oats Cookies

Almond and Oats Cookies


To make 20 cookies

Ingredient:

1 ½ cup rolled oats
1 tsp baking powder
½ cup chopped roasted almond
1 lemon zest (or ½ cup desiccated coconut)
½ cup caster sugar
2 tsp rice flour
3 tsp oil
¼ cup hot water (or hot milk)

Method:


  1. Preheat oven to 180oC and line cookies tray with baking paper

  2. Mix all dry ingredient (including lemon zest if used) in a mixing bowl, make sure all the ingredients are well-mixed

  3. Stir in oil and slowly add in hot water (milk) until a sticky mixture is formed (you may need more water if the mixture is too dry)

  4. Form 1 tbsp of the mixture into a ball and place on the tray

  5. Using the back of a fork to lightly press down the mixture ball

  6. Bake for 25 minutes until the back of the cookies is golden while the top is still white

  7. Cool the cookies on wiring rack

I chose to share this recipe this time as it is a very simple cookies to make, and not to mention the crunchiness outside and chewiness inside.Besides, this is a pretty healthy snack as Oat is good for lowering cholestrol and almond is good for health too. If you choose to use the hot water instead of milk, this cookies is an option for people who are lactose intolerence. Why dont make yourself and your family with some nice and healthy cookies? They can be kept in a air-tight container for a week.


Hope you will enjoy it. See you next time.


1st Anniversary

Wow, it has been a year since I started this blog and I cant believe i had shared recipes with you. Of course, without your support, i can never make this far. Think back one year ago, I am still pretty new in cooking and baking, and now i started to give tips to people for cooking and baking.

The most exciting part is Jeffery's Kitchen has came to LIVE. My food has started to be sold in some charity events, i made cupcake and cookies for fundraising and kuih for an Asian food festival. As an engineer, I never think i can walk that far in a food industry.

For those stay in Adelaide, there will be more chance for you to try out my food as I am going to set up a stall in Norwood Sunday Market. I promise you will get the best food, cake and dessert from my stall. Date and time still to be confirmed.

Lastly, I promise i will share more recipes in the coming years and hope you will love it.

Last but not least, your support is always kindly regarded and I would like to say million thanks to you. Love you all.

Monday, August 8, 2011

Leek Mushroom and Chicken Mini Pie

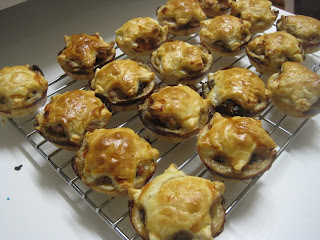
Harlo everyone, It is August, winter is ending soon. What can be compared with a pie dish during the cold winter? Especially these little cutties can storm up any winter dishes. Leek, mushroom and chicken, a perfect combination to me. With a star-shaped crispy pastry on the top, I bet you can have five in a time when they just come from the oven. With the secret Edem cheese in the middle of the pie, it is like a sunshine in the wet winter shining in this mini pie.


Leek mushroom and chicken mini pie (make 18)


Ingredient:
250g chicken mince
1 tsp soy sauce
1 tsp fish sauce
2 tsp corn flour
25g butter
1 medium carrot, diced
1 medium leek, thinly sliced
200g button mushroom, diced
2 tbsp plain flour
2 tbsp chicken stock powder
1 tsp dried oregano
1 cup hot water
½ cup dried white wine/ verjuice
4 strings fresh thyme
18 cubes edem cheese (about 1cm x 1cm x 1cm cube)
4 sheets frozen puff pastry, thawed
1 egg, beaten with 1 tsp of milk


Method:


  1. Marinate chicken mince with salt, pepper, soy sauce, fish sauce and corn flour for at least 10 minutes;

  2. Brown chicken on a hot pan with enough olive oil, set aside and cool;

  3. Melt butter on a big fry pan. Cook carrot for 2-3 minutes then stir in leek for 1 minute or until soft. Add in mushroom and stir until mushroom is brown all through;

  4. Stir in plain flour for 1 minute and well mix;

  5. Add chicken back into the pan and add chicken stock and oregano, stir until well mix;

  6. Add in hot water (until just cover the chicken – maybe need more hot water or less than 1 cup depending on the size of the pan);

  7. Add in dried wine or verjuice and stir the mixture until well combine (try to scrap the bottom of the pan to get all the goody);

  8. Put in thyme and season with salt and pepper. Simmer with lid for about 10-15 minutes until the mixture is thickened;

  9. Turn off heat and cool;

  10. Preheat oven to 200oC;

  11. Greased 2 12-holemuffin trays. Using a 7.5cm round cookies cutter to cut 18 round pastry from 2 sheets puff pastry and a star-shaped cookies cutter to cut 18 star pastry from another 2 sheets puff pastry ( you now got 18 round and 18 star–shaped pastry);

  12. Gently press the round pastry into the muffin tray to form a small casing;

  13. Remove the thyme from the pie filling and spoon about 1½ tablespoon of filing into the pastry case to about ¾ full. Repeat until all case is filled;

  14. Put one cube of cheese in the middle of the pie and gently press into the filing;

  15. Brush the edge of the pie with beaten egg, then top the pie with the star-shaped pastry and brush the star-pastry with beaten egg;

  16. Bake in a preheated oven at 200oC for 30-35 minutes or until golden brown;

  17. Set aside and cool for 5-10 minutes before serving.

It seem like a complexdish to make, however, it is not. I think itwill take about 50 minutes including the baking time. Better be fast to cook this before the winter end. It is definitely a recommended dish for Xmas due to the little star on the top. Hope you will like it. See you soon.


Tuesday, July 26, 2011

Chocolate Flat Cake

Hi guys, first of all, i really want to apologise for disappearing for such a long time (~3 months). Had been busy researching and working on my brother's wedding cake. Sometime, i only turn on my laptop during weekend if i am not working on weekend.

Today the recipe i am going to share is actually a fail recipe when i first created it. I wanted to make a chocolate cake but it came out the cake was quite dry. I changed the recipe into a cookies/biscuit recipe, and i baked the batter like baking cookies. The texture of it was actually very nice - crunchy outside and chewy inside. Therefore, i named it "flat cake" - cake texture in the middle but it is flat.


Chocolate Flat Cake

Ingredient:
1 cup plain flour + ½ cup wholemeal flour, sifted
½ tbs baking powder
½ cup brown sugar
60g butter, melted
1 egg
¼ cup milk
1tbs vanilla essence
½ cup of each dark and milk chocolate chip/button

For decoration
Melted white chocolate
Speckles

Method:
1. Preheat oven to 180oC and line 2 baking tray with greased baking paper
2. Combined flours and baking powder in a bowl. In a separately bowl, whisk sugar, melted butter, egg, milk and vanilla essence until combined
3. Melt the dark and milk chocolate by double boiling method
4. Make a well in dry ingredient and mix in the wet ingredient until well-combined (don’t over mix it). Add in melted chocolate and stir until combined
5. Scoop a spoonful of batter on baking paper (to make around 16). Flatten the batter a bit by using a back of spoon.
6. Bake for 15 mins until cook. Decorate while the cake is still hot so the chocolate or speckle can stick on the cake. Cool the cake for 10 mins before serving
7. The cake is best serve on the same day it has prepared while the outside is crunchy and inside is chewy


It is a very easy recipe and trust me, you wont stop eating after having the first one. Hahaha.....it is so good to go with a hot coffee. Hope you will enjoy it.


I will try to update at least one recipe per month. Until then, hope all of you happy and healthy. See ya.

Saturday, April 30, 2011

Chocolate Chip Hot Cross Bun

Made these during the last easter, they came out very good; they can considered as the best bun i ever made. I know it may be too late to share it now since the easter has gone. However, who says we cant eat hot cross bun even it is not easter? Sure we can make hot cross bun everyday, hahahaha.......


Chocolate Chip Hot Cross Bun


Ingredient:
4 cups plain flour, sifted
2 package dry yeast (2x7g)
¼ cup caster sugar
1 ½ tsp mixed spice
Pinch of salt
40g butter
300ml milk
2 eggs, lightly beaten
½ cup chopped dark chocolate
½ cup milk chocolate chip
Flour paste
½ cup flour, sifted
4-5 tbs water

Method:


  1. Combine sifted flour, yeast, sugar, spice and salt (dry mixture)

  2. Melt butter in a small saucepan, add milk and turn heat to medium for 1 minute until the milk mixture is lukewarm

  3. Add the warm milk mixture and eggs into dry mixture

  4. Using a flat knife to mix the mixture then use greased hands to form a soft dough

  5. Turn the dough onto a lightly floured surface and knead for 10 minutes until the dough is soft and elastic

  6. Put the dough into a greased mixing bowl and cover with a damp towel for 1-1.5 hours or until the dough is risen double its size

  7. Knock down dough (punch fist once into centre and hit the dough on working surface) for 1 minute until soft

  8. Roll the dough into long shape and cut into 12 portions

  9. Flatten each portion into 5mm thick and sprinkle with some milk and dark chocolate pieces, enclose the small dough and twist the dough so some chocolate pieces are outside the surface, finally shape the small dough into a ball

  10. Repeat for the remaining small dough and put on a baking tray (lined with baking paper) with 1cm apart, cover the buns with damp towel for 30 minutes or until they are double their size

  11. Meanwhile preheat the oven to 190oC and prepare the flour paste

  12. Brush bun with egg wash (1 egg + 1tbsp milk) and using the flour paste to form a cross on the buns, bake for 20-25 minutes until golden

  13. Rest 5 minutes and serve best while hot or microwave for 15s on high if they are cold

Flour paste:
1. Mix flour with water until a smooth paste, more water is needed if the paste is too thick
2. Put into a zip-lock bag, cut off one of the angle so it is easily to squeeze the paste to form a cross on the bun.

Saturday, April 2, 2011

Roasted Gingery Salt Chicken

Hello everyone, I am back. Had been busy with work and seldom to create new dishes. Today I am going to share an Asian's recipe, where it is from a recipe book i got from my best friend who is now in Paris. Thank you very much, Cello !!

It is a simple and delicious dish. It reminds me the Hainanese Chicken i ate in Malaysia. The crispiness of the skin and the taste of the ginger just combine well with steam rice and any other side dishes. Here come the recipe:


Roasted Gingery Salt Chicken

Ingredients:


2 chicken whole legs


Marinating:


3 tbsp fresh ginger juice (squeeze from grated ginger)


1 tsp salt


1 tbsp Shaoxing wine


Method:


  1. Cut a slit on the chicken whole legs. Put the chicken in a shallow bowl and mix well with the marinate. Marinate the chicken at least two hours or overnight in the fridge.

  2. Roast chicken whole legs with the marinate sauce in a preheated oven at 200oC for 30-45 minutes until golden brown and well cooked.

  3. Remove and cut into pieces. Serves with the warm marinate sauce.

Is it very simple? It is very cheap too. I ate this with steam rice and a crunchy warm vege salad. I made the salad by mixing red cabbage, carrot and brocolli; then slighly stir-fried them till they are warm but still crunchy.


Hope you will like it. I will try to keep updating the recipes from the photos in Facebook. Before that, hope u have a nice day and enjoy.